
The smell hit me first—that acrid, metallic scent of a circuit board screaming for help. I was in the middle of a heavy render on my workstation when the fans suddenly spiked to a pitch I didn’t know they could reach, and then… silence. My screen went black. I had ignored the warning signs for months. Whether you are rocking high-end gaming laptops or trying to squeeze another year out of your student laptops, the factory-applied thermal paste has a shelf life. When it dries out, your machine starts to suffocate. I’ve been there, staring at a $1,500 brick, wondering if I just killed my livelihood. But here is the good news: you don’t need a degree in electrical engineering to fix this. I am going to show you exactly how to replace that "clay" with fresh paste without snapping a single ribbon cable.
Your Laptop Is Gasping for Air
Most people assume their computer is just getting "old" when it starts to lag. They start looking for unbeatable laptop deals thinking a replacement is the only cure. In reality, your CPU is likely just hitting its thermal limit and slowing itself down to prevent a meltdown. This is especially common because gaming laptops still struggle with thermal throttling due to their thin profiles and high power draw. When I first started tinkering, I made the classic rookie mistake of using way too much paste—I basically frosted the CPU like a cupcake. It was a mess, but it taught me that precision matters more than quantity. According to testing by hardware experts at Tom’s Hardware, proper repasting can drop load temperatures by as much as 10 to 15 degrees Celsius in some models. That is the difference between a smooth experience and a stuttering mess.
Is Cracking Open Your Case Actually Worth the Risk?
I get the hesitation. The idea of taking a specific screwdriver kit to your expensive machine feels like open-heart surgery. You’re worried about static, stripped screws, or "leftover parts" when you’re done. But let me ask you this: have you ever felt your laptop get so hot it actually felt uncomfortable to type on? If the answer is yes, then the risk of doing nothing—which is a dead motherboard—is actually higher than the risk of a careful DIY repair. We aren’t just talking about speed; we’re talking about the longevity of your hardware. If you’ve been searching for student laptops that balance power and portability, you know how expensive these machines are. Learning to maintain them is the best way to protect your investment. Let’s get your tools ready and dive into the process.
Get the Right Tools Before You Crack the Shell
First things first: do not use a kitchen knife or a generic hardware store driver. You are dealing with tiny, easily stripped screws that will ruin your day. You absolutely need the specific screwdriver kit you need to open 90% of modern laptops. Beyond the drivers, grab some 99% isopropyl alcohol and lint-free wipes—coffee filters actually work in a pinch because they don’t leave fibers behind like paper towels do. Think of this like prepping a canvas; any debris left behind will ruin the thermal bond. I once tried to ‘save time’ by using a cotton swab and some cheap 70% alcohol on an old workstation. The result? Tiny fibers got trapped in the paste, creating microscopic air pockets. My idle temps jumped by five degrees until I tore it back down and did it properly with a microfiber cloth.
Clear Out the Crusty Factory Paste
Once you are inside, you will see the copper heat pipes snaking across the motherboard. Carefully unscrew the heatsink in a diagonal pattern (usually numbered 1 through 4) to ensure even pressure release. When you lift that copper assembly, you’ll likely see what looks like dried, grey cement. That is your problem. Use your wipes and alcohol to gently dissolve that old gunk until the silver surface of the CPU and GPU shines like a mirror. If you have been looking for ways how to clean the dust out of your laptop without opening it, you’ve probably realized by now that air cans can’t touch this baked-on residue. While you have the heatsink off, check the fans for dust bunnies; this is also the perfect time to learn how to replace a dead laptop fan without voiding the warranty if yours has been rattling. 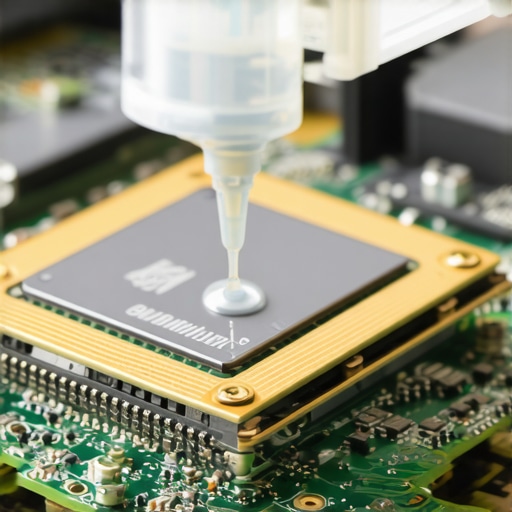
Apply the Paste with Surgical Precision
Now for the ‘meat’ of the job. For most game-changing gaming laptops for 2025 adventures, the CPU die is rectangular. A small ‘pea’ sized drop in the center is the gold standard, but for longer chips, a thin line works better. You want enough to cover the shiny die once the heatsink is pressed down, but not so much that it oozes onto the motherboard. It is like putting just enough mustard on a sandwich—too much and it’s a mess, too little and it’s dry. Because gaming laptops still struggle with thermal throttling in small frames, the quality of this application is your primary defense against performance drops. Lower the heatsink straight down; do not wiggle it. Tighten the screws in the same numbered sequence you used to remove them to ensure the paste spreads perfectly flat. If you feel a ‘crunch’ or see paste escaping the sides, stop, clean, and try again. Precision here is what separates a professional repair from a botched DIY project.
A common trap I see people fall into is thinking that a $30 peripheral can solve a fundamental engineering flaw. Everyone tells you to buy an RGB-lit cooling stand, but the reason why most laptop cooling pads are just loud paperweights comes down to physics—they blow air at a plastic chassis, not the actual silicon. If you are pushing game-changing gaming laptops for serious players in 2025 to their limit, that external fan is doing almost nothing for the dried-out paste sitting directly on your core. In my experience, a $10 tube of high-viscosity paste is worth ten cooling pads combined.
The Cooling Pad Myth That Everyone Swallows
The contrarian truth is that the best way to cool your machine isn’t adding more fans; it is ensuring the fans you already have can actually move heat away from the processor. I have seen users spend hundreds on must-have laptop accessories to boost your work setup while their CPU is thermal throttling at 100 degrees Celsius. They think they need a new machine and start hunting for top laptop deals in 2025, when the actual fix costs less than a lunch. If you haven’t addressed the internal thermal interface, you’re just putting a band-aid on a broken bone.
Stop Choosing Your Thermal Paste Based on Price Alone
Here is a nuance most beginners miss: the “pump-out effect.” Laptops operate under much higher thermal cycles than desktops. According to detailed testing by the hardware experts at Igor’s Lab, many standard thermal pastes suffer from this effect, where the constant expansion and contraction of the heat sink literally pushes liquid-thin paste out of the contact zone over time. This is why you might find that your laptop runs great for two weeks after a repaste, then suddenly starts overheating again. You need a thicker, high-viscosity compound specifically designed for direct-die cooling, especially on high-performance business laptops for professionals that run hot during video renders.
Can Software Under-Volting Actually Replace Repasting?
I get asked this a lot by the DIY crowd: can’t I just use software to lower the voltage and skip the teardown? While under-volting is one of the only 3 ways to genuinely speed up a slow laptop by reducing heat, it is not a magic bullet. If your factory paste has turned into a ceramic cracker, no amount of software tweaking will help the heat move from the chip to the radiator. However, combining a fresh repaste with a slight undervolt is the “pro move” that can extend the life of your hardware by years. Don’t be fooled into thinking why 8gb of ram is no longer enough for modern browsing is your only performance bottleneck—thermal health is just as critical. Have you ever fallen into this trap of buying accessories to fix a hardware heat problem? Let me know in the comments.
Avoid the Fatal Screw Tension Trap
The biggest “oops” factor I see involves the heatsink screws. People often over-tighten them, thinking more pressure equals better cooling. In reality, modern laptops use very thin motherboards. If you crank those screws down too hard, you can actually warp the board or crack the delicate silicon die. Always use a cross-pattern and stop the moment you feel resistance. If you are working on student laptops that boost productivity and learning, remember these machines are built for lightness, not heavy-duty mechanical stress. Take it slow, be precise, and your hardware will thank you with silent fans and peak speeds.
The job doesn’t end when you tighten the last screw. In fact, that is just where the real maintenance cycle begins. If you are serious about keeping your game-changing gaming laptops for serious players in 2025 running at peak performance, you need to move beyond hardware and start looking at the data. I never consider a repaste finished until I have run a 30-minute stress test while logging data with HWInfo64. According to the detailed technical documentation for HWInfo64, monitoring ‘Thermal Throttling’ flags is the only way to know if your heatsink is actually making full contact across all cores. If core #1 is 15 degrees hotter than core #4, you have an uneven mount, and you need to go back in.
How do I maintain my laptop’s peak performance over several years?
Maintenance is a rhythm, not a one-time event. Every six months, I make it a point to use a soft brush and a vacuum (carefully!) to perform the best way to clean your laptop keyboard from crumbs and oil before they migrate into the fan intakes. I also keep a digital log of my idle temperatures. If I see my baseline creep up by five degrees, I know it is time to check for dust buildup. For those using top business laptops for productivity in 2025, this simple habit can be the difference between a machine that lasts three years and one that lasts seven. It is about being proactive rather than waiting for the ‘metallic scent’ of failure I mentioned earlier.
Stop Losing Those Tiny Screws and Parts
One trick that saved my sanity was buying a magnetic project mat. When you are taking apart student laptops that boost productivity and learning, you will find that manufacturers love using four different screw lengths in one panel. If you put a long screw into a short hole, you can pierce the motherboard or ‘dimple’ the plastic palm rest from the inside. I personally use a grid system: every screw goes into a specific box on the mat corresponding to its location on the chassis. This is one of those must-have laptop accessories for a seamless setup that costs ten dollars but prevents a hundred-dollar mistake.
Phase Change Materials are the Future of Cooling
Looking ahead, I predict we are going to see a massive shift away from traditional ‘liquid’ thermal pastes. We are already seeing the rise of phase-change materials like Honeywell PTM7950. These are solid pads at room temperature but turn into a high-performance liquid when the chip gets hot. They essentially eliminate the ‘pump-out effect’ entirely. While they are mostly found in enthusiast circles now, they will likely become the standard for business laptops for professionals who want zero-maintenance longevity. If you are tired of repasting every year, switching to a phase-change pad is the ultimate ‘set it and forget it’ move. My challenge to you: download a sensor monitor tonight, run your heaviest app, and see if your CPU is hitting 90 degrees. If it is, don’t go hunting for top laptop deals in 2025 just yet—try a deep clean first.
The Hard Truths I Discovered After Repasting My Fifth Machine
After years of tinkering with everything from thin ultrabooks to heavy-duty workstations, I’ve realized that thermal paste isn’t magic; it is a bridge that requires a perfect build. One of the most important lessons I learned is that the viscosity of the paste matters more than the fancy branding. If the paste is too runny, the heat cycles will eventually push it out, leaving your chips bare. I also discovered that when your machine starts feeling sluggish and loud, repasting is truly one of the only 3 ways to genuinely speed up a slow laptop that actually addresses the physical reality of thermal throttling. Finally, I learned that ‘factory specs’ are often just the bare minimum—manufacturers use cheap, bulk-applied paste to save pennies, which is why even premium hardware can benefit from a manual refresh.
The Survival Kit for Tech Maintenance
You do not need a professional lab to save your hardware, but you do need a few trusted items to avoid a DIY disaster. First, never start without the specific screwdriver kit you need to open 90% of modern laptops; using the wrong bit is the fastest way to strip a screw and end your repair before it begins. I also recommend keeping a digital copy of your laptop’s service manual from the manufacturer’s website—it identifies exactly where the fragile ribbon cables are hidden. If you find that the internal heat has already caused permanent damage to your components, it might be a safer bet to start browsing top laptop deals in 2025 rather than pouring more money into a dying motherboard.
Claim Your Hardware Longevity Today
The first time you press that power button after a successful repaste is always a bit nerve-wracking, but the silent fans and low idle temps are the ultimate reward for your hard work. Taking control of your machine’s thermal health is the most effective way to ensure your game-changing gaming laptops for serious players in 2025 stay at peak performance for years to come. Do not let a few grams of dried-out factory paste be the reason you throw away a perfectly good computer. You have the tools and the knowledge now—go ahead and let your processor breathe again. What was the highest temperature you ever saw your CPU hit before you decided to take action? Let me know below!