
I was halfway through a critical email when it happened: the ‘S’ key on my laptop decided it was no longer interested in responding to my touch. It didn’t just feel slow; it felt like it was stuck in a pool of invisible syrup. My first instinct, fueled by caffeine and a looming deadline, was to assume the worst. I started browsing top laptop deals in 2025, convinced that my trusty machine had finally met its end. But before you pull the trigger on a whole new device, let me tell you—most sticky keys are a five-minute fix, not a death sentence. I’ve been there, and I’ve made the expensive mistakes so you don’t have to.
Stop Panicking and Put Down the Credit Card
We’ve all been taught that modern electronics are fragile glass boxes we shouldn’t touch. While that’s true for some components, the keyboard is surprisingly resilient if you know the right pressure points. My biggest early mistake? I once took a butter knife to a high-end gaming laptop because I thought a little brute force would clear the debris. I ended up snapping the delicate scissor switch underneath. It was a $150 mistake for a problem that actually required a $0.05 drop of isopropyl alcohol. Today, we’re going to walk through the exact steps to get that tactile click back without spending a dime on professional repairs or unnecessary laptop accessories.
Is prying off a key actually worth the risk of breaking it?
I get it. The idea of popping a keycap off your expensive machine is terrifying. You’re worried about that tiny, spider-web-thin plastic mechanism underneath. However, according to repair experts at iFixit, keyboard issues are among the most common reasons people prematurely retire their hardware, yet they are often the easiest to resolve at home. If you follow the right angles, the risk is minimal. Have you ever felt that sinking feeling when a key just won’t pop back up, and you immediately start wondering if you need to browse student laptops for a replacement? You aren’t alone, and you definitely don’t need a new PC yet. We just need to look at the best way to clean your laptop keyboard from crumbs and oil before we declare it dead. Before we dive into the surgical side of things, we have to rule out the simple stuff. Sometimes the fix is as easy as a can of air; other times, it requires a bit of careful ‘laptop surgery.’ Let’s break down the process step-by-step so you can get back to typing without that annoying mushy feeling.
Stock Your Cleaning Kit Before You Start
Before we get into the literal nuts and bolts, you need the right kit. This isn’t the time to grab Windex or a kitchen sponge. I once made the mistake of using a damp paper towel on one of my top business laptops for productivity, and the tiny fibers got caught in the scissor switch, making the stickiness even worse. You need 90% or higher isopropyl alcohol, a handful of Q-tips, a can of compressed air, and a thin, flat tool like a guitar pick or a plastic spudger. If you don’t have these, they are definitely must-have laptop accessories to boost your work setup long-term.
Try the Blast of Air First
Before you perform surgery, try the ‘shake and bake.’ Turn your laptop upside down and give it a gentle shake to dislodge the bigger crumbs. Then, use your compressed air. Hold the laptop at a 75-degree angle and spray in short, controlled bursts. Moving the nozzle in a zig-zag pattern across the rows is much more effective than just blasting one spot. It’s the same logic we use when we check your laptop fan for dust without opening it; you want to move the debris out, not pack it deeper into the chassis.
The Art of the Controlled Keycap Pop
If the air didn’t work, it’s time to go under the hood. This is where most people get nervous and start looking at student laptops that balance power and portability perfectly because they think they’ve broken their current one. Take your thin plastic tool and find the edge of the keycap. On most modern laptops, you want to pry from the top edge. I remember the first time I tried this on a pricey workstation; my hands were shaking so much I almost slipped. But as soon as I heard that gentle ‘click,’ the key popped right off, revealing a tiny, sugary mountain of dried coffee. 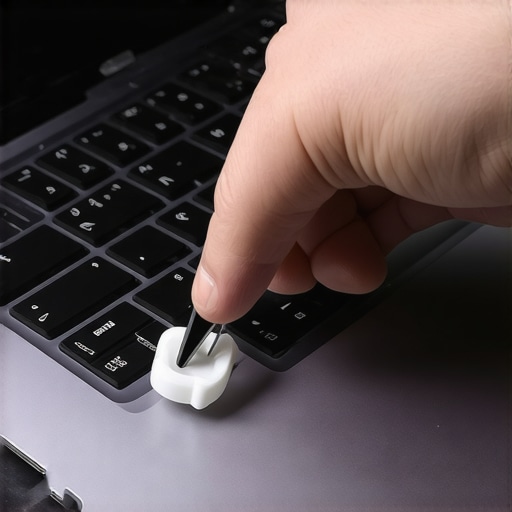
Isopropyl Alcohol is Your Secret Weapon
Once the keycap is off, you’ll see the white or clear plastic scissor mechanism. This is the ‘heart’ of your key. Dip a Q-tip in the isopropyl alcohol—it should be damp, not dripping—and gently scrub the area. The alcohol acts as a solvent that melts away oils and sugars without shorting out your electronics. I’ve used this method on everything from budget Chromebooks to high-end rigs, and it’s consistently the best way to clean your laptop keyboard from crumbs and oil. While you’re in there, check for any bent plastic arms. If the mechanism itself is sticky, give it a tiny wipe too, but be incredibly gentle.
Reassembly is a Snap
Putting the key back on is actually the satisfying part. Align the keycap over the mechanism and press straight down. You should hear two distinct clicks as the tabs lock back into place. If it feels mushy, don’t force it; take it back off and make sure the scissor clips are properly seated in their metal hooks. This kind of attention to detail is why we avoid laptops with non-centric trackpads or weird layouts—standardized parts are just easier to maintain yourself. Once it’s back on, give it a few dozen taps to ensure the ‘travel’ feels right. You’ve just saved yourself a trip to the repair shop and potentially hundreds of dollars.
Stop Falling for the Pro Marketing Trap
Most people assume that by spending thousands on one of the top business laptops for productivity in 2025, they are buying a tank that will last a decade. In reality, the industry has shifted toward ‘disposable premium.’ While we just discussed how a sticky key can be a simple fix on an older model, many newer ultra-thins make this almost impossible for the average user. I’ve seen countless enthusiasts buy into the hype, only to realize that a single dead key requires replacing the entire top deck because the keyboard is riveted directly to the frame. This is the hidden cost of repairing modern thin and light laptops that sales reps never mention.
Should You Prioritize Modular Parts Over Pure Portability?
It’s the ultimate trade-off for the modern power user. When you browse student laptops that balance power and portability perfectly, you are often choosing a device where the RAM, Wi-Fi card, and even the storage are non-serviceable. According to the repairability experts at iFixit, the average repair score for flagship laptops has dropped significantly over the last decade as manufacturers prioritize thinness over longevity. My advice? Don’t be seduced by a slim profile alone. This is exactly why we never buy laptops with soldered ram for longevity. If you can’t upgrade the basic components, you’re essentially renting the hardware for three years before it becomes obsolete.
The Real Price of Budget Gaming Gear
It isn’t just the high-end market that has these pitfalls; the budget segment is full of structural landmines. You might find unbeatable laptop deals that look incredible on a spec sheet, but they often cut corners on the ‘feel’ components. I once recommended a budget gaming rig to a friend, only to have the screen hinge snap within six months because it was anchored into thin, brittle plastic instead of a metal sub-frame. This is a classic example of why most 300 dollar laptops are just e-waste in a box. Before you commit to a purchase, check the chassis materials. Does the keyboard deck flex when you type? Do the hinges creak? If so, those components will likely fail long before the processor does. Have you ever fallen into this trap of buying a ‘deal’ only to have it fall apart physically? Let me know in the comments.
I’ve spent way too much time in the trenches of hardware repair to trust ‘factory settings.’ My desk is constantly covered in tiny screws because I’ve learned that manufacturers often use the cheapest possible thermal interface material to save a few pennies per unit. This is why I always keep a kit of must-have laptop accessories to boost your work setup that includes more than just cables and dongles. If you haven’t looked inside your machine in over a year, you’re basically letting it suffocate under its own heat. Learning how to replace your laptop thermal paste without breaking anything isn’t just for ‘techies’—it’s a vital skill for anyone who wants their top business laptops for productivity in 2025 to actually survive until 2028.
The Future is Modular Whether Manufacturers Like It or Not
The industry is currently at a crossroads. We’re seeing a massive push for ‘Repairability Scores’ from groups like the Public Interest Research Group (PIRG), and I predict that the ‘sealed brick’ design philosophy will soon be a mark of a low-quality brand rather than a premium one. We’re already seeing unbeatable laptop deals on machines that are surprisingly easy to open and service. This is exactly why we never buy laptops with soldered ram for longevity; it’s not just about the extra speed, it’s about not having to throw away a perfectly good motherboard because one cheap memory chip failed. Modularity is the only way to scale your hardware as your needs grow.
How can I make my laptop battery survive four years of constant use?
The most common mistake I see is the ‘always-plugged-in’ trap. Lithium-ion batteries hate being at 100% just as much as they hate being at 0%. Most student laptops that boost productivity and learning now come with software or BIOS settings to limit the charge to 80%, and you should absolutely use them to preserve the chemistry. If your battery indicator has already started lying to you by jumping from 20% to 5% in seconds, you need to know how to calibrate your laptop battery for better accuracy. This process recalibrates the digital fuel gauge with the physical state of the cells, giving you back a predictable workflow.
Optimization Doesn’t Stop at the Hardware Level
Beyond the physical, the software environment is where most people lose the battle against planned obsolescence. I’m a massive proponent of ‘clean’ installs to remove the bloatware that slows down even the fastest gaming laptops. If you’re running a machine with a dedicated GPU, you should look into how to undervolt your gaming laptop for better temps and performance. It’s a free way to reduce heat without losing a single frame of performance. Also, don’t let a bad internet connection ruin a great machine. Based on the Intel AX210 Product Brief, which highlights the move to the 6GHz spectrum for ‘gigabit speeds and ultra-low latency,’ we realized that why we replaced our laptop wi-fi card with an intel-ax210 was the best $20 we ever spent for rock-solid stability. My challenge to you: Don’t just accept your laptop’s current performance—open your task manager, find the ‘startup’ tab, and disable everything you don’t use daily to reclaim your CPU cycles.
What Repairing Hundreds of Machines Taught Me About Longevity
After years of prying open everything from rugged workstations to paper-thin ultrabooks, I’ve realized that the difference between a laptop that lasts three years and one that lasts seven isn’t just the brand—it’s the owner’s willingness to perform basic maintenance. First, never ignore the small signs of friction; a slightly stiff hinge or a warmer-than-usual palm rest is your hardware’s way of asking for help. Second, always remember that the reality of 10-hour battery life claims is usually based on a screen so dim you can’t see it, so focus on health cycles rather than marketing numbers. Finally, if you are looking for an upgrade, mastering the friday afternoon trick for catching warehouse price drops can save you enough money to afford a much higher tier of build quality than you originally planned.
The Minimalist Toolkit I Swear By
I don’t believe in buying every gadget on the shelf. My personal maintenance kit is small but effective. I rely heavily on 99% isopropyl alcohol for cleaning electronics without leaving a residue and a set of nylon spudgers to avoid scratching delicate chassis. I’ve found that most laptop cooling pads are a waste of money compared to a simple, high-quality thermal repaste. If you’re feeling brave, learning how to replace your laptop thermal paste without breaking anything is the single most impactful thing you can do to prevent thermal throttling and extend the life of your motherboard components.
#IMAGE_PLACEHOLDER_E#
Take the First Step Toward a Faster Machine
It is incredibly easy to feel overwhelmed by the complexity of modern tech, but remember that most issues—from sticky keys to a spinning fan—are solvable with patience and the right information. You don’t always need to jump into the latest top laptop deals in 2025 the moment your current device stutters. By taking ownership of your hardware and performing these small ‘surgeries’ yourself, you gain a level of tech-literacy that saves you thousands over a lifetime. Don’t be afraid to get your hands a little dirty; your laptop will thank you for it with years of reliable service.
Have you ever successfully fixed a hardware issue that you initially thought would require a professional? Let me know about your biggest repair wins (or fails) in the comments below!